Natural dyeing

How to scrunch dye with onion skins

I decided to go with scrunch dyeing for the upcycled tank top from my last post. Here’s a simple video tutorial of the method – scroll down for step by step instructions.

Step one: Scrunching

Choose a white item of clothing to dye.

Begin scrunching the top from one corner inwards. You can do a gentle or tight scrunch, they will just give different results. Do it tightly for strong contrast between dyed and undyed sections, or do it very loosely for a slightly dappled, almost solid colour.

Keep scrunching until the whole item is scrunched up.

Step two: Binding

Hold the scrunched bundle together with loose weave fabric, a mesh bag, string or rubber bands, so that it will keep this scrunched shape in the dye pot. The fabric on the outside will pick up the most dye, and some colour will seep into the folds. Again, how tightly or loosely you bind it will affect the results. I have used an old delicates washing bag to hold this bundle together, and I went for a medium scrunch, to get some obvious colour variation but without stark white patches.

Step three: Dyeing

Put your bundle in a dyepot and add your dyestuff. I used onion skins, because they are easy to get and they contain strong, substantive dyes. I also added a splash of iron mordant, to shift the colour to olive green and to help bind the dye to the fabric. You could also prepare your fabric with soy milk binder or a mordant in advance, but I was keeping things simple here.

Cover the fabric and dyestuff with boiling water, and simmer until you get a good depth of colour. I cooked this bundle for about 90 minutes, then let it sit in the dyebath overnight.

Step four: Unwrapping

Once your bundle has cooled down, unwrap it and admire the beautiful, organic pattern you have created!

Every scrunch dye is different and it is impossible to replicate results. Isn’t it wonderful sometimes to surrender to chance and embrace whatever happens? Such good medicine for the year we have just had.

I hope you enjoyed this simple tutorial and as always, I’d love to see your results if you give it a try. Leave a link in the comments or tag me on Instagram @gumnutmagic

Natural dyeing with avocado seeds: step by step instructions

Dyeing with avocado is a safe and simple process, perfect for beginners to natural dyeing. Both the seeds (also called stones or pits) and the skins contain colour. They produce a quite colourfast dye of the most unexpected and delightful pink.

The exact colour you get will be affected by which variety of avocado you use, the time of year, the pH of your water, and whether you use the seeds or the skins or both. For this tutorial I have used just the seeds. I collected them over a couple of months, washing them well and storing them in the freezer. This keeps the colour better than drying them out.

Baby onesie naturally dyed with avocado seeds

Materials

  • Avocado seeds or skin or a mix of both (well washed)
  • Soy milk mordanted cotton fabric (find some instructions here), or wool/ silk
  • An aluminium or stainless steel dye pot (aluminium will provide a mild mordanting effect but is not necessary)
  • A long-handled spoon or stick for stirring
  • Loose weave fabric such as muslin for straining the dye

Instructions for natural dyeing with avocado seeds


Step one

Cover the seeds in water and simmer gently for 1-2 hours. Turn the heat off and let the dye rest for several hours or, even better, overnight.

Dyeing with avocado seeds. Step one: cover with water

Pink avocado seed dye bath

Step two

Break up the seeds to make more of the dyes available. This is best done while wearing gloves because the tannins can irritate your skin. If the seeds are too firm to break up, repeat step one first.

Natural dyeing with avocado. Step two: break up the seeds

Step three

Re-heat the dye bath for another hour or so to let the colour develop further. Let it cool again, then strain through the loose weave fabric.

Straining avocado stone dye

Step four

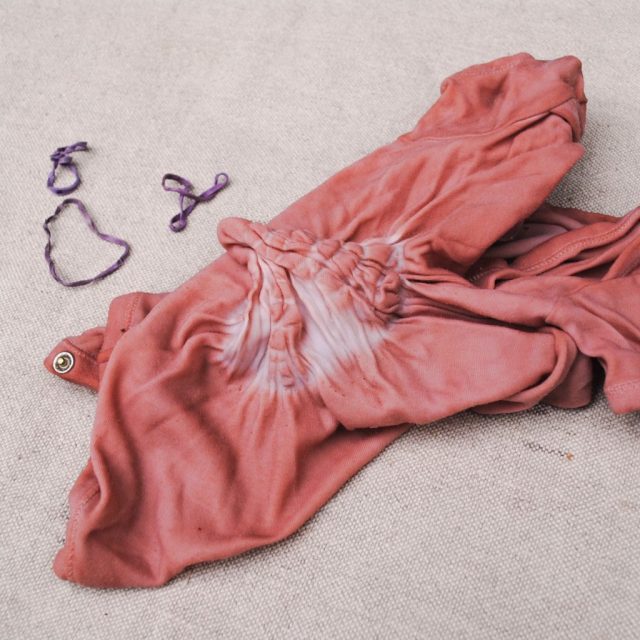
If you want to create a shibori effect, tie off sections of your fabric using rubber bands or string. For the top on the left, I tied off 3 sections to create 3 white lines. For the onesie on the right, I gathered fabric in the centre and wrapped it in rubber bands to create a circle pattern.

Shibori techniques for natural dyeing

Step five

Bring the dye bath back to simmering, then add your fabric (pre-wet it so that it will absorb the dye evenly). Add extra water so there is enough space for the fabric to move freely. This will also help to create even colour. Let it cook on a very low heat for about one hour, stirring from time to time. Leave it to cool overnight, stirring occasionally. The colour will continue to develop as it sits.

Adding soy-mordanted cotton to an avocado dyebath

Step six

When you are happy with the colour, remove the fabric from the dye pot. Keep in mind that the colour will lighten as the fabric dries.

Natural pinks from avocado dye

Squeeze out the excess dye, and rinse well. Then remove the rubber bands to reveal the resist pattern.

Shibori dyeing with avocado dye

Avocado seed tie dyeing

Results

Depending on the avocados you used and the pH of your water, you should get lovely peach to pink tones on your fabric. Below you can see that my soy mordanted cotton came out an earthy pink, somewhat lighter once it dried but still a rich colour. I also added a piece of silk to the dye pot and it turned a more peachy tone. You can shift peach dyes to pink by altering the pH of your dyepot with a small amount of washing soda.

Natural dyeing with avocado seeds: step by step instructions

Shibori resist lines on avocado dyed cotton

I’ve also had some wonderful results using avocado dyed fabric as a dye blanket when eco-printing on paper. Take a look here.

Pin the below image if you would like to come back to this tutorial later. And if you do try dyeing with avocado, let me know in the comments!

Tutorial for natural dyeing with avocado seeds/stones/pits

Dyeing with Australian Indigo

I’ve been wanting to try dyeing with Australian indigo (Indigofera australis) for a long time. I’ve got a small bush growing but it is still too young for harvesting. So I was very excited when some friends offered me clippings from their huge plant.

There are a few tutorials online specifically for Australian indigo, at Turkey Red Journal and Tinker Maker. But I really wanted to keep it natural and avoid using Sodium Hydrosulphite. I kept researching and came across a method for Japanese indigo which uses cold processing of fresh leaves. Although Japanese indigo (Persicaria yinctorium) is not related to Australian indigo, both plants contain indican which is the precursor to indigo.

I used cotton prepared with a soy milk binder, and followed the instructions on The Dogwood Dyer’s blog. This involved whizzing up fresh leaves in a blender with cold water and straining the green liquid out. I folded and tied some small cotton samples and soaked them in the dye. After the first soak the cotton has turned this vivid green:

Dyeing with Indigofera Australis

The next day I did many rounds of short dips and each time the cotton got darker and more blue.


Naturally dyed with australian indigo

This is the darkest that the triangle got, plus some lighter, greener samples and an Indigofera australis leaf. Isn’t it magic that these leaves can produce such a dark blue?!

Naturally dyed with Indigofera Australis

This was my first time trying shibori. It was so exciting to unwrap my little triangle and discover the beautiful patterns that folding and tying had made on this top.

Shibori with Australian indigo

And here are a few other shibori samples, tied with rubber bands and soaked for different lengths of time.

Australian Indigo shibori dyeing samples

I really enjoyed beginning to explore the many hues that Australian Indigo can produce. Now to find and grow more plants!

Shibori dyeing with Indigofera Australis

Natural dyeing with avocado seeds

I’ve recently been naturally dyeing some solid colours, rather than eco-printing. I’ve been aided in my experiments by Rebecca Desnos’ beautiful ebook. She inspired me to try dyeing soy-mordanted cotton with avocado seeds (avocado stones/pits). When I first put the fabric in the dye bath I didn’t quite believe it would do anything. The dye looked quite pale. But I left the fabric in the pot for a day and a half and it slowly turned this vivid pink!

Avocado stone dye- dyeing with avodado seeds/pits on soy mordanted cotton

I tried eco-printing over this fabric but didn’t have much success. But I was able to use it as a dye blanket to create a beautiful resist effect on some watercolour paper. I covered some iron-mordanted watercolour paper with gum leaves, then laid a piece of my avocado-dyed cotton on top, pressed it between 2 tiles and boiled for an hour. Some of the avocado dye transferred to the paper and the pink turned to purple in reaction with the iron.

Watercolour paper eco-printed with avocado and gum leaves


You can Pin the below image if you want to come back to this later.


Use avocado dyed fabric as a dye blanket when eco-printing on paper