tutorial

How to scrunch dye with onion skins

[responsivevoice_button]

I decided to go with scrunch dyeing for the upcycled tank top from my last post. Here’s a simple video tutorial of the method – scroll down for step by step instructions.

Step one: Scrunching

Choose a white item of clothing to dye.

Begin scrunching the top from one corner inwards. You can do a gentle or tight scrunch, they will just give different results. Do it tightly for strong contrast between dyed and undyed sections, or do it very loosely for a slightly dappled, almost solid colour.

Keep scrunching until the whole item is scrunched up.

Step two: Binding

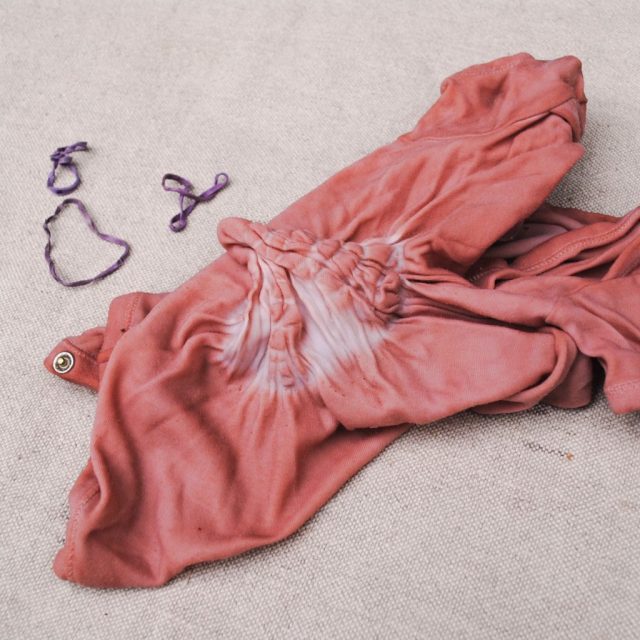
Hold the scrunched bundle together with loose weave fabric, a mesh bag, string or rubber bands, so that it will keep this scrunched shape in the dye pot. The fabric on the outside will pick up the most dye, and some colour will seep into the folds. Again, how tightly or loosely you bind it will affect the results. I have used an old delicates washing bag to hold this bundle together, and I went for a medium scrunch, to get some obvious colour variation but without stark white patches.

Step three: Dyeing

Put your bundle in a dyepot and add your dyestuff. I used onion skins, because they are easy to get and they contain strong, substantive dyes. I also added a splash of iron mordant, to shift the colour to olive green and to help bind the dye to the fabric. You could also prepare your fabric with soy milk binder or a mordant in advance, but I was keeping things simple here.

Cover the fabric and dyestuff with boiling water, and simmer until you get a good depth of colour. I cooked this bundle for about 90 minutes, then let it sit in the dyebath overnight.

Step four: Unwrapping

Once your bundle has cooled down, unwrap it and admire the beautiful, organic pattern you have created!

Every scrunch dye is different and it is impossible to replicate results. Isn’t it wonderful sometimes to surrender to chance and embrace whatever happens? Such good medicine for the year we have just had.

I hope you enjoyed this simple tutorial and as always, I’d love to see your results if you give it a try. Leave a link in the comments or tag me on Instagram @gumnutmagic

How to scrunch dye with onion skins Read More »

Tank top upcycling tutorial

[responsivevoice_button]

I’ve been working on some simple sewing tutorials. Ways to upcycle clothing you already have, into more interesting items. First up is a tank top, which I have shortened and shaped and turned into an asymmetrical top with exposed seams.

Start with a tank top that is one size too big – it will become smaller in the sewing process.

Cut off the armhole hems if they are bulky.

Then cut 2 curves from the arm holes down to the hemline – it’s fine to do this by eye. You can divide it into thirds like I have done here, or make the middle panel a bit wider (I think that looks better). Just make sure that after the initial curve, you cut straight down. This will help the seams align later on.

A simple upcycling tutorial - turn a tank top into an asymmetrical top with exposed seams. Read more at gumnutmagic.com/blog

Sew these curves back together on an overlocker, with the seams on the outside. Overlock the side seams too, straightening them up if they curve out like this one does. Try it on – if it is still too big, you can take it in more at the side seams.

Cut across the body of the top at the true waist, and again about 5-10 cm above the bottom hem line.

A simple upcycling tutorial - turn a tank top into an asymmetrical top with exposed seams. Read more at gumnutmagic.com/blog

Remove the centre strip (it could be used as a cowl or even to make a matching hood for this top). Align the top and bottom pieces. You can sew them together like this…

or rotate the bottom piece to create an off-centre look:

Sew these two pieces together and you’re done!

A simple upcycling tutorial - turn a tank top into an asymmetrical top with exposed seams. Read more at gumnutmagic.com/blog

Here’s a photo of the side, to show you how some of the seams align and some don’t.

This top is destined for the dye pot – I’ll post the results of that soon, once I decide whether to scrunch dye or eco-print it.

Here’s another version I made using an old terracotta-coloured top:

A simple upcycling tutorial - turn a tank top into an asymmetrical top with exposed seams. Read more at gumnutmagic.com/blog

It’s the same basic shape, but I made the middle panel wider which gives it a different feel. I love wearing it with this silk dress that I eco-printed with eucalyptus leaves.

A simple upcycling tutorial - turn a tank top into an asymmetrical top with exposed seams. Read more at gumnutmagic.com/blog

Please let me know if you try this out – I would love to see your results! And also let me know if you would like to read more of these little tutorials. They are pretty simple, but they are designed with my younger self in mind, who didn’t have many sewing skills but wasn’t big on sewing with patterns. Hopefully this tutorial inspires you to create a funky futuristic top from something you already own.

Tank top upcycling tutorial Read More »

Eco-printing on paper video tutorial: St John’s wort

[responsivevoice_button]

Here’s a simple video tutorial for eco-printing on paper using St John’s wort. I’ve used three different variables to get quite different results from a single plant:

  • plain watercolour paper
  • paper soaked in iron mordant
  • paper soaked in logwood dye

Although I love the bright results St John’s wort gives on plain paper, the discharge print is really special. As mentioned in the video, you can learn more about discharge eco-printing on paper from my ebook, Plant Poetry. That ebook covers a whole range of methods for eco-printing on paper, and has many examples of plants that are suitable to use.

Here’s a quick version of the tutorial, if you just want to see the process without all the explanations:

Please excuse the sideways orientation, it’s to make it easier to view for those of you on phones!

Here’s the three variations together:

If you’d like to learn more about St John’s wort, or check out some more prints using this plant, take a look at my earlier blog post.

Eco-printing on paper video tutorial: St John’s wort Read More »

Make your own natural tinsel for an eco-friendly Christmas

[responsivevoice_button]

For a long time I have been looking at my collection of dried up paper daisies and feeling inspired to make some ‘natural tinsel’ with them. Paper daisies are some of our most spectacular Australian flowers, both in shape and colour, and because they last so well they could also make lovely house decorations beyond the festive season.  

Although I usually celebrate the Summer Solstice at this time of year, I thought it would be fun to actually have a Christmas tree this year and honour some of the traditions I grew up with.

A simple christmas tree made from tied together sequoia branches

I made a simple Christmas tree from fallen sequoia branches gathered near my house. I was inspired by Tokopa’s fabulous version (find instructions here), which is far lusher than mine, although I do enjoy the simple, rustic charm of my one. Paper daisy tinsel seemed like the perfect way to decorate it, keeping it simple and natural.

Here’s some step-by-step instructions in case you want to try it yourself. 

Natural flower tinsel tutorial

You will need:

A bouquet of paper daisies (or other flowers that dry out well, like rose buds)

String

A needle

Scissors

A bowl filled with paper daisies, a pair of scissors, a needle in string

Step one

Cut the stems of all the paper daisies. Cut a few metres of thread – you can lay all the flowers out on top of it to approximate how much you will need, or just guess. Thread your needle and push it through the front of the paper daisy to the back. Going in this direction stops it from getting squashed and breaking any petals. Pull the needle through the flower and push it to the end of your string. Tie it in place.

Fingers pushing a threaded needle through a paper daisy

Step two

Keep threading paper daisies onto the string, leaving as much gap between each as you desire. You may want to tie a knot before and after each flower, to keep them in place. 

Some paper daisies threaded on string, with more waiting to be added on

Step three

Once you have threaded all of your flowers, tie the last one in place and cut off any excess string.

A full garland of string threaded with paper daisies, arranged in a spiral on white fabric

Congratulations – your tinsel is ready to be wrapped around your Christmas tree or hung from the ceiling. Handle it carefully to avoid tangling the string.

Flowers threaded on string, wrapped around a christmas tree

Variation

You can also push the flowers up against each other, leaving no gap. This creates a lusher, more tinsel like effect. It also requires a lot more flowers for even a short length of string!

Paper daisies threaded on string, pushed firmly against each other

I hope this might inspire you to use natural materials to make your own Christmas or seasonal decorations. Pin the below image to save this idea for later:

A montage of all the steps involved in making natural tinsel from paper daisies

Make your own natural tinsel for an eco-friendly Christmas Read More »

Eco-printing on paper video tutorial

This video gives step-by-step instructions for eco-printing on paper using a rusty can. I love this method because it is easy to get interesting prints with most types of paper and leaves, although I have used some of my favourites for this demonstration.

This is one of the methods I share in my eco-printing on paper ebook, Plant Poetry, along with lots of information about plants, papers and bundling techniques to try.

If you just want to watch a quick preview of the whole process, check out this short video:

I hope that this inspires you to get creative with the plants around you. Have fun experimenting!

Eco-printing on paper video tutorial Read More »

Natural dyeing with avocado seeds: step by step instructions

Dyeing with avocado is a safe and simple process, perfect for beginners to natural dyeing. Both the seeds (also called stones or pits) and the skins contain colour. They produce a quite colourfast dye of the most unexpected and delightful pink.

The exact colour you get will be affected by which variety of avocado you use, the time of year, the pH of your water, and whether you use the seeds or the skins or both. For this tutorial I have used just the seeds. I collected them over a couple of months, washing them well and storing them in the freezer. This keeps the colour better than drying them out.

Baby onesie naturally dyed with avocado seeds

Materials

  • Avocado seeds or skin or a mix of both (well washed)
  • Soy milk mordanted cotton fabric (find some instructions here), or wool/ silk
  • An aluminium or stainless steel dye pot (aluminium will provide a mild mordanting effect but is not necessary)
  • A long-handled spoon or stick for stirring
  • Loose weave fabric such as muslin for straining the dye

Instructions for natural dyeing with avocado seeds


Step one

Cover the seeds in water and simmer gently for 1-2 hours. Turn the heat off and let the dye rest for several hours or, even better, overnight.

Dyeing with avocado seeds. Step one: cover with water

Pink avocado seed dye bath

Step two

Break up the seeds to make more of the dyes available. This is best done while wearing gloves because the tannins can irritate your skin. If the seeds are too firm to break up, repeat step one first.

Natural dyeing with avocado. Step two: break up the seeds

Step three

Re-heat the dye bath for another hour or so to let the colour develop further. Let it cool again, then strain through the loose weave fabric.

Straining avocado stone dye

Step four

If you want to create a shibori effect, tie off sections of your fabric using rubber bands or string. For the top on the left, I tied off 3 sections to create 3 white lines. For the onesie on the right, I gathered fabric in the centre and wrapped it in rubber bands to create a circle pattern.

Shibori techniques for natural dyeing

Step five

Bring the dye bath back to simmering, then add your fabric (pre-wet it so that it will absorb the dye evenly). Add extra water so there is enough space for the fabric to move freely. This will also help to create even colour. Let it cook on a very low heat for about one hour, stirring from time to time. Leave it to cool overnight, stirring occasionally. The colour will continue to develop as it sits.

Adding soy-mordanted cotton to an avocado dyebath

Step six

When you are happy with the colour, remove the fabric from the dye pot. Keep in mind that the colour will lighten as the fabric dries.

Natural pinks from avocado dye

Squeeze out the excess dye, and rinse well. Then remove the rubber bands to reveal the resist pattern.

Shibori dyeing with avocado dye

Avocado seed tie dyeing

Results

Depending on the avocados you used and the pH of your water, you should get lovely peach to pink tones on your fabric. Below you can see that my soy mordanted cotton came out an earthy pink, somewhat lighter once it dried but still a rich colour. I also added a piece of silk to the dye pot and it turned a more peachy tone. You can shift peach dyes to pink by altering the pH of your dyepot with a small amount of washing soda.

Natural dyeing with avocado seeds: step by step instructions

Shibori resist lines on avocado dyed cotton

I’ve also had some wonderful results using avocado dyed fabric as a dye blanket when eco-printing on paper. Take a look here.

Pin the below image if you would like to come back to this tutorial later. And if you do try dyeing with avocado, let me know in the comments!

Tutorial for natural dyeing with avocado seeds/stones/pits

Natural dyeing with avocado seeds: step by step instructions Read More »

How to eco-print on paper

Eco-printing on paper is a fun and easy way to introduce children to the wonders of natural dyeing or to get started with it yourself. Here’s a tutorial for one particular method, using autumn leaves. Autumn leaves print particularly well because they are high in tannins and carotenoid and anthocyanin pigments, which all give colour. But you could also try this process at any time of year, with any leaves that you have around you (results will obviously vary).

Materials:

  • Strips of watercolour paper
  • Wood blocks or tiles to press the paper between
  • String
  • Autumn leaves- especially red and purple. I used maple, liquidambar and claret ash

Eco-printing on paper tutorial

A simple method for eco-printing on paper


Step 1

Fold your paper into a concertina booklet, slightly smaller than the blocks or tiles you are using. Wet it lightly, then arrange the leaves on each page.

Plant dyes on paper

Step 2

Fold your paper up with the leaves inside. You can also put a leaf on the front and back covers. Then press between the wood blocks or tiles.

Eco-printing on paper

Step 3

Wrap your wood blocks with string to hold the bundle together. You want firm pressure so that each leaf is pushed into the paper, to make a clear print. With tiles, you can clamp them together with bulldog clips.

Wrapping eco-print paper bundles

Step 4

Once your bundles are wrapped, put them in a pot of boiling water and simmer for 45 minutes to 1 hour. It is always best to use a dedicated dyepot, not one you also use for cooking. If the wood blocks float, weigh them down with a rock.

Eco-print bundle

Step 5

Let them cool, then carefully unwrap, remove the leaves and let the paper dry.

Autumn leaves eco-printed on paper

If you want to learn further eco-printing on paper techniques, or find out about more types of leaves that will give good prints, have a look at my eco-printing on paper ebook, Plant Poetry. Or if you want to return to this project later, you can pin the below image.Eco-printing on paper tutorial using autumn leaves and watercolour paper. Step by step instructions.


How to eco-print on paper Read More »

Eco-printing on paper tutorial

Eco-printing on paper is a fast, easy and satisfying way to get started with this wonderful craft process. You don’t need much in the way of special tools or equipment and you can experiment with the plants growing around you.

This tutorial shares a particularly simple yet effective method for eco-printing on paper, using a tin can and whatever paper you already have. It’s my favourite method for paper, because it is so easy to get interesting results. The effects you get will depend on your local flora, the paper you use and many other variables. Have fun experimenting!

Materials for eco-printing on paper

  • Paper
  • Mordant- iron soaked in vinegar
  • Plastic gloves
  • Leaves and flowers
  • Onion skins
  • Tin cans (rusty if possible)
  • String
  • Dye pot

Method of eco-printing on paper

Step one

Select and prepare your paper. I like to use cotton-rag watercolour paper that I buy at art stores. It has a beautiful texture and doesn’t tear easily when wet. But you will get some sort of result on any paper. Even basic paper like printer paper can give stunning results.

Cut your paper to the desired size. For this tutorial I cut narrow strips that can be wrapped around the tin can. You could also make small cards.

I mordanted my paper using a similar technique as that described in my eco-printing on paper ebook – giving the paper a short soak in water with a dash of iron-vinegar. Wear gloves to protect your hands from the mordant. You can let the paper dry after mordanting, or continue with the process. But if you are using a rusty tin can, you can omit the mordanting process and just let the rust work it’s magic.

Step two

Gather plant matter. For my paper prints, I’ve been exploring a range of both native Australian and introduced flowers and leaves. Most were gathered fresh, though some had been soaking in water for a few weeks. When choosing plants to use, look for interesting outlines, and leaves or flowers that will press fairly flat. And please avoid any toxic plants as you will be touching them and breathing in their fumes!

Eco-printing on paper

Step three

Arrange the leaves on the paper. Leave some gaps and spaces so that the outlines have more chance of being visible. You can also try experimenting with layering materials for a different effect. Try sprinkling crushed onion skins over the paper, to add extra colour.

Ecoprinting on paper tutorial for beginners

Step four

Roll the paper around the tin can. If you are using a rusty can, the paper in contact with the rust will print darker than other sections. When you have rolled all the paper around the can, tie it with string or fabric strips to hold it in place.

Using a rusty tin can to eco-print paper

Step five

Place your paper bundle in a dye pot (a cooking pot dedicated to dyeing only, to avoid food contamination) and cover with boiling water. Bring to the boil, then simmer for about 1 hour. If possible, do this step outside or open doors and windows to ensure good ventilation.

Step six

After the bundle has cooled down, it can be left overnight, or for a few days, to allow the natural colours to continue to develop. Or you may choose to open it immediately. Unwrap slowly and carefully to avoid ripping the paper. If some of the leaves seem stuck, don’t pull them off. Instead, submerge the paper in some water and rub them gently.

Eco-printing on paper using rusty tin cans and native flora

Step 7

Allow your eco-printed paper to dry, noticing how some colours shift or fade in this process. Then enjoy your beautiful paper- use it for cards or scrapbooking, or display it as an art piece. And if you didn’t get the results you were after, keep trying!

More techniques for eco-printing on paper

If you are interested in learning more techniques for getting good eco-prints on paper, check out my ebook Plant Poetry. It’s a comprehensive guide which includes many examples of specific plants to use, comparisons of results on different types of paper, and special effects such as soy mordants, dye blankets, iron blankets and discharge printing. Check it out by clicking here and take your paper eco-prints to the next level.

I also have some more free tutorials for eco-printing on paper:

Have fun creating!

Learn how to eco-print on paper using flowers and leaves

Eco-printing on paper tutorial Read More »